
For: Parts clerks, warehouse staff and service managers · Permission: Inventory management (the email switches also need Manage Account Settings) · Time: ~3 minutes
Quick summary
- Open Parts & Inventory → Inventory Locations and click the location's name.
- To bring parts in, click + Receive Stock.
- To take parts out, fix a count, move stock or set limits, open the ⋮ menu next to it and choose Issue, Adjust, Transfer Out or Set Thresholds.
- Search the part, enter the quantity and confirm.
Before you start
- You'll need: At least one inventory location (see Set Up Inventory Locations) and inventory-management access.
- Where it lives: Parts & Inventory → Inventory Locations → the location's page. The ⋯ menu at the end of each row on Inventory Locations has the same actions (Receive Stock, Issue Stock, Adjust Stock, Set Thresholds) if you'd rather not open the location.
Read a location's stock table
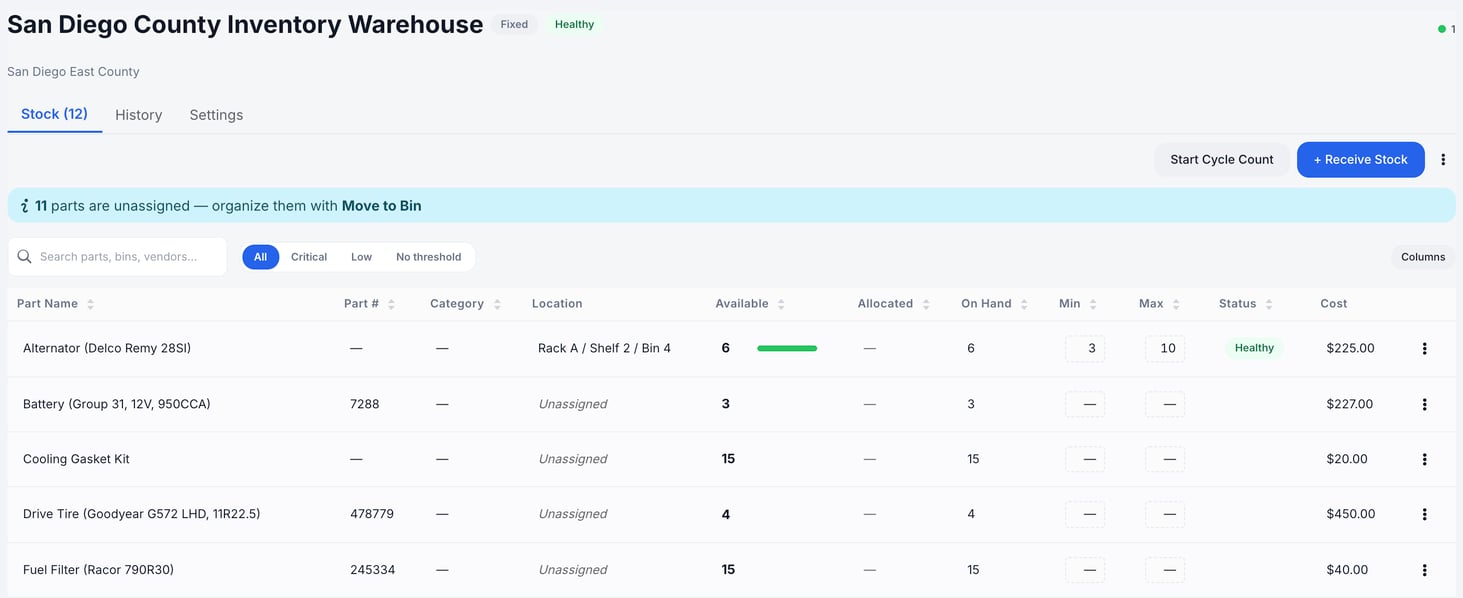
Each location page has a Stock tab with one row per part: Location (the bin, or Unassigned), Available, Allocated, On Hand, Min, Max, Status and Cost (you see Cost only if you can view cost or manage parts). Use Critical, Low or No threshold above the table to see only those parts.
Receive stock when parts arrive
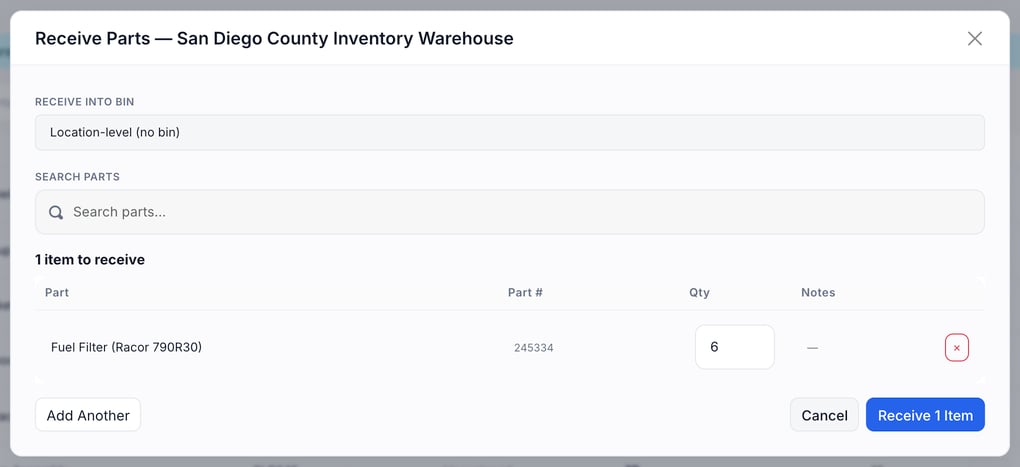
- Open the receive window. On the location page, click + Receive Stock. The Receive Parts window opens with the location name in its title.
- Pick a bin, if the location has bins. In Receive into bin, choose the bin, or leave Location-level (no bin).
- Add each part. Type in Search parts, click Add next to the part, enter the Quantity (and a note if you like), then click Add. Use Add Another for the next part.
- Confirm. The button counts your lines, for example Receive 1 Item. Click it. On Hand goes up.
Part not in the search? It isn't in your catalog yet. Choose Create Part from the location's ⋮ menu, or see Add New Parts to Your Inventory, then receive it.
Issue, adjust or move stock
Open the ⋮ menu next to + Receive Stock:
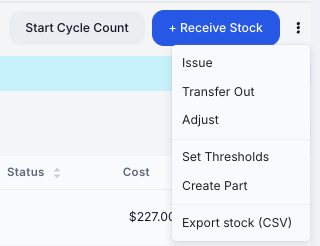
- Issue opens Issue Stock. Use it for parts that leave stock outside a job: shop use, warranty, scrap. Search the part, enter how many, and click Issue Stock. On Hand goes down.
- Adjust opens Adjust Stock. Use it to correct a count you've checked on the shelf. It doesn't record use. For a full count of the location, use Start Cycle Count instead (see Run a Cycle Count).
- Transfer Out opens Transfer Stock. Pick the Destination location, choose the parts, and click Review Transfer. See Inventory Transactions and Transfers.
- Export stock (CSV) downloads the location's stock list. See the next section.
Don't use Issue for repairs. Parts used on a service order or PM are deducted automatically when the work completes. That's what Allocated tracks. If a PM visit used more than the On Hand count, stock stops at 0 and the extra units go to Reconciliation, filed as Part Not Stocked. See Fix Parts That Didn't Come Out of Stock and Understanding Available, Allocated & Consumed.
Export a location's stock to CSV
Use this to open a location's stock in a spreadsheet or print a count sheet.
- Open the location. Go to Parts & Inventory → Inventory Locations and click the location's name. Set the filter to All and clear the search box, so every part is listed.
- Open the menu. Click the ⋮ menu next to + Receive Stock.
- Click Export stock (CSV). It's the last item in the menu shown above. Your browser downloads the file right away. Nothing else opens.
The file is named after the location and the date, for example San-Diego-County-Inventory-Warehouse-stock-20261019.csv. It has one row for each part listed in the table, with these columns:
- Part Name, Part # and Category
- Bin (blank when the part is unassigned)
- On Hand, Min and Max
- Status (for example No threshold)
The file holds the rows you can see. If Critical, Low or No threshold is selected, or the search box has text, the file has only those parts. Choose All and clear the search to export every part.
No costs in the file. The export leaves out the Cost column you see in the stock table. Only people with inventory management access see Export stock (CSV) in the menu.
Set min and max thresholds
Choose Set Thresholds from the ⋮ menu, search the parts, enter a Min and Max for each, and click Save Thresholds. You can also type a Min or Max straight into the stock table. Once a part has thresholds, its Status shows (for example Healthy), and the Low and Critical filters pick it up. Parts without them appear under No threshold.
Get a low-stock email
Once a part has a Min, your team can get an email when it drops below it, plus a weekly digest. See Low-Stock Alerts and the Weekly Inventory Digest.
QuickBooks
When QuickBooks is connected and Parts sync is on, your stock changes sync once a night as one stock adjustment line. For which account each change posts to, see How Stock Adjustments and Inventory Value Reach QuickBooks.
Troubleshooting
| Symptom | Likely cause | Fix |
|---|---|---|
| A part isn't in the Receive search | It isn't in your catalog yet | Add the part first, then receive it. |
| Available is lower than On Hand | Some stock is Allocated to open jobs | That's expected. Available = On Hand − Allocated. |
| An error box appears when you type a Min or Max in the stock table, and the number reverts | The save was refused. The box gives the reason, for example Permission denied: InventoryManage. when your login doesn't have inventory management. | Ask an admin for inventory-management access, or try again. If the box says the threshold couldn't be saved, re-enter the number. |
| A part won't flag as Low | No Min/Max threshold set | Choose Set Thresholds from the location's ⋮ menu, or type the Min and Max in the stock table. |
| I received into the wrong place | Wrong bin or location chosen | Use Adjust Stock on the wrong place to take the count back down, then receive into the right one. To move stock instead, use Transfer Out. |
| No low-stock email arrives | The low-stock switch is off, or the part has no minimum | Set the part's Min, then see Low-Stock Alerts and the Weekly Inventory Digest. |
| The file has fewer parts than the location | A filter or search was on when you exported | Choose All, clear the search box and export again. |
| Export stock (CSV) isn't in the ⋮ menu | Your login doesn't have inventory management access | Ask an admin for inventory-management access. |
FAQs
What's the difference between Issue and Adjust?
Issue records a known outflow (you used 2). Adjust sets the count to what's on the shelf after a recount.
Do I need to receive into a bin?
Only if the location has bins. Then pick the bin in the Receive window. Otherwise leave Location-level (no bin) selected. See Organize a Location with Bins.
Why does a part show no status?
It has no Min and Max yet. Set them with Set Thresholds or in the stock table.
What's in the exported file?
Part name, part number, category, bin, on hand, min, max and status. It has no cost columns. See Export a location's stock to CSV above.