
For: Parts managers and admins · Permission: Manage inventory · Time: ~3 minutes per part
Quick summary
- Open Parts & Inventory › Reconciliation.
- Read the Reason for each pending row.
- Choose Manual Issue and pick the location the part came from.
- Fix the setup behind the reason so new orders deduct on their own.
Why a part lands in Reconciliation
When an order closes, MetaFleet takes each part out of stock. It tries the order's own reservation first, then the technician's service vehicle, then a default shop. A part that can't be taken from any of these goes to the Reconciliation list. Nothing is lost: the row waits for you. A PM visit works the same way for parts the technician added during the visit.
| Reason on screen | What it means |
|---|---|
| No Location | The technician has no service vehicle and no default shop applies. |
| Not Stocked | The location doesn't stock the part, or has less than the order used. |
| Error | Something went wrong while taking the part out of stock. |
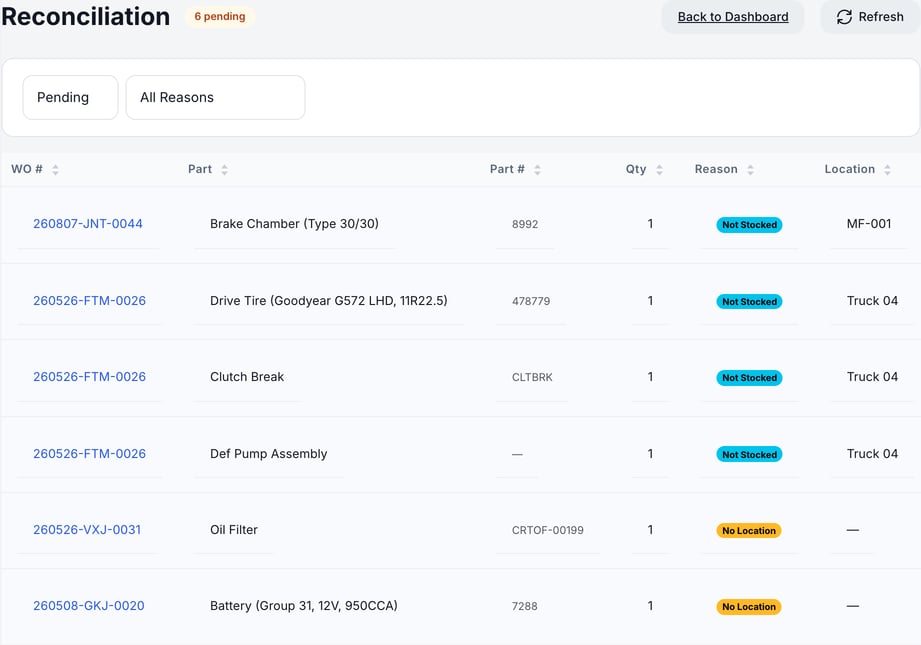
A PM visit that uses more of a part than the location has on hand takes what is there, down to 0, and sends the rest here as Not Stocked. It never takes stock below zero. For a PM part that isn't stocked, the Location column names the technician's truck or the area's default shop. A No Location row shows a dash there. Non-standard parts raise no row.
Before you start
- You need the Manage inventory permission. Without it, Reconciliation doesn't appear in the menu.
- Know where the part really came from: a vehicle or a shop shelf.
Open the Reconciliation list
You can get there two ways:
- Open Parts & Inventory › Reconciliation.
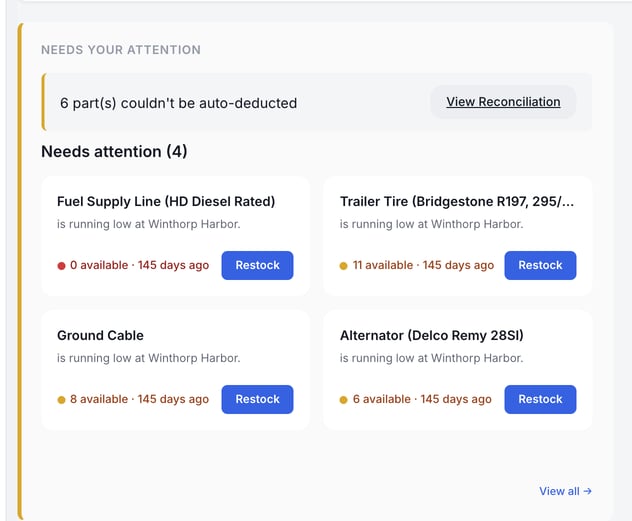
- On Parts & Inventory › Inventory Dashboard, click View Reconciliation in the row that reads "N part(s) couldn't be auto-deducted". The Reconciliation button at the top shows the same count.
The badge next to the title shows how many rows are pending. Each row shows the order number (WO #), the part, the part number, the quantity, the reason and the location. A PM row shows a dash (—) under WO #, because a PM visit has no service order. Manual Issue works the same on it.
Filter the list
The list opens on Pending. Switch the first filter to Resolved, Dismissed or All to see past rows. The second filter limits the list to one reason: No Vehicle / No Default, Part Not Stocked or System Error. Click Refresh to reload.
Issue the part by hand
- Open the menu. Click ⋯ at the end of the row, then Manual Issue.
- Check the quantity. Quantity to issue is filled in from the order. Change it only if the order used a different amount.
- Add a note. Notes (optional) is a good place for what happened.
- Pick the source. Under Select source location, choose where the part came from. Each location shows how many it has in stock. A location with 0 can't cover the quantity, so pick one with enough. Service vehicles carry a Vehicle badge.
- Click Issue Stock. The stock comes out of that location and the row moves to Resolved.
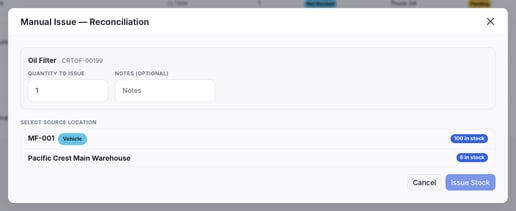
If the window says This part isn't stocked at any location, no location has the part. Receive the part first (see Receive, Issue and Adjust Stock), then issue it.
Dismiss a row
Choose Dismiss from the ⋯ menu when the part wasn't used, or when you handled the stock another way. Dismiss doesn't ask you to confirm or give a reason, and the row moves to Dismissed at once. Dismissing doesn't change stock.
Check the part before you dismiss. If the part was used and you dismiss the row, your stock count stays too high.
Stop it from happening again
- No Location: assign a service vehicle to the technician (see Track Inventory on Service Vehicles).
- Not Stocked: add the part to the vehicle or shop that usually supplies it, and keep enough on hand.
- Error: click Refresh to reload the list. Refresh only reloads; it doesn't retry the deduction. If the row stays, use Manual Issue.
Check what needs restocking
The Inventory Dashboard has a Needs attention list. Each card names a part that is running low at a location and shows how many are available.
- A red dot means 0 available.
- An amber dot means the part is below its minimum.
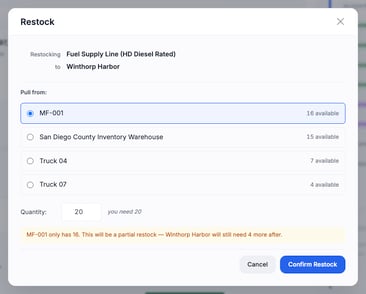
Each card has a Restock button. It opens a window with the part and the destination filled in. Pick the location to pull from and check the quantity, which starts at the shortage. A note appears when the source can't cover it all. Click Confirm Restock to move the stock, or Cancel to close the window without moving it. Receiving and issuing stay with Receive, Issue and Adjust Stock.
To set the minimums that drive these cards, see Low-Stock Alerts and the Weekly Inventory Digest.
Troubleshooting
| Symptom | Likely cause | Fix |
|---|---|---|
| Reconciliation isn't in the menu | Your role lacks the Manage inventory permission. | Ask an admin to add it. |
| A warning banner with a Retry button replaces the list | The records didn't load, often because the connection dropped. | Click Retry. |
| The Manual Issue window lists no locations | No location has the part in stock. | Receive the part, then reopen Manual Issue. |
| Rows keep coming back for the same technician | The technician has no service vehicle and no default shop applies. | Assign a service vehicle (see Stop it from happening again). |
| A part is low but missing from Needs attention | The part has no minimum set. | Set a minimum on the part. |
FAQs
Does a row in Reconciliation mean the order didn't close?
No. The order closes as usual. Only the stock deduction for that part is waiting.
Can I undo Dismiss?
The row stays under Dismissed for reference. There is no undo button, so check before you click.
Is the order number a link?
No. Copy the number and search for it in Service Orders. PM rows show a dash instead of a number.
Will the same part come back if I fix the setup?
New orders deduct on their own. Rows already in the list stay until you issue or dismiss them.