
For: Anyone who moves or audits parts stock · Permission: Inventory management · Time: ~3 minutes
Quick summary
- Go to Parts & Inventory › Transfers and pick a transfer type.
- Choose the vehicle or the source and destination locations.
- Add each part and its quantity, then select Review Transfer.
- Select Confirm Transfer (N items). Stock leaves the source and lands at the destination.
- Open a location's History tab to check the move.
Before you start
- You'll need: Inventory-management access.
- Locations: At least two. For a truck restock, you need a shop or warehouse and a service vehicle.
- Stock at the source: A transfer moves only available units: the quantity on hand minus what is reserved for service orders. The part search shows Available Stock at the source. You can't enter more than the available units.
Open the Transfers page
Go to Parts & Inventory › Transfers. Three cards sit at the top of the page, one for each transfer type.

Shop to Vehicle restocks a service vehicle from the shop. Vehicle to Shop returns parts from a vehicle to the shop. Shop to Shop moves parts between fixed locations.
Choose the transfer type and the vehicle
Select the card for the move you're making:
- Shop to Vehicle: restocks a service vehicle from the shop. Select the destination vehicle in the Select Destination Vehicle window.
- Vehicle to Shop: returns parts from a vehicle to the shop. Select the source vehicle in the Select Source Vehicle window.
- Shop to Shop: moves parts between two fixed locations. Select the source location in the Select Source Location list.
Pick the source and destination
After you pick the vehicle or location, the Transfer Stock window opens. Its title names the source. Then set the other side in the Destination Location list.
- Shop to Vehicle: the title names the shop. The Destination Location list starts at Select destination, so pick the vehicle from it.
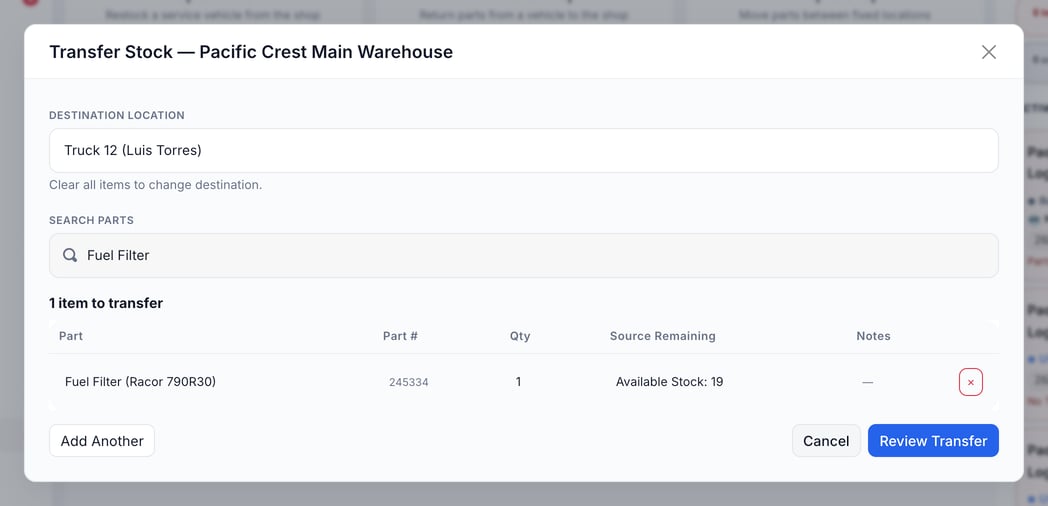
Shop to Vehicle: the destination list holds the service vehicles, and the item list shows what is left at the shop.
- Vehicle to Shop: the title names the vehicle. Pick the shop or warehouse the parts are going to.
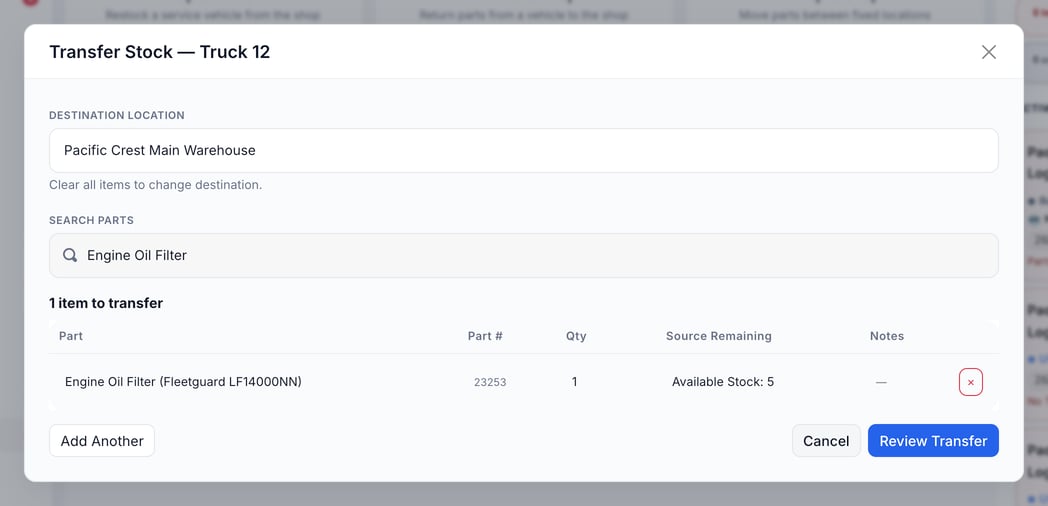
Vehicle to Shop: the destination list holds the shops and warehouses, and the part search lists what is on the vehicle.
- Shop to Shop: the title names the source location. Pick the location the parts are going to. Any location that is not a vehicle is on the list, including consignment locations.
If the destination has bins, a Destination bin list also appears. Pick a bin, or leave it at location level.
Add the parts and quantities
Under Search Parts, type the part name. Each result shows its Available Stock at the source, added up across the part's bins. Select the part, enter a Quantity (the box says of N available), add an optional note in Notes, and select Add. To move another part, select Add Another.
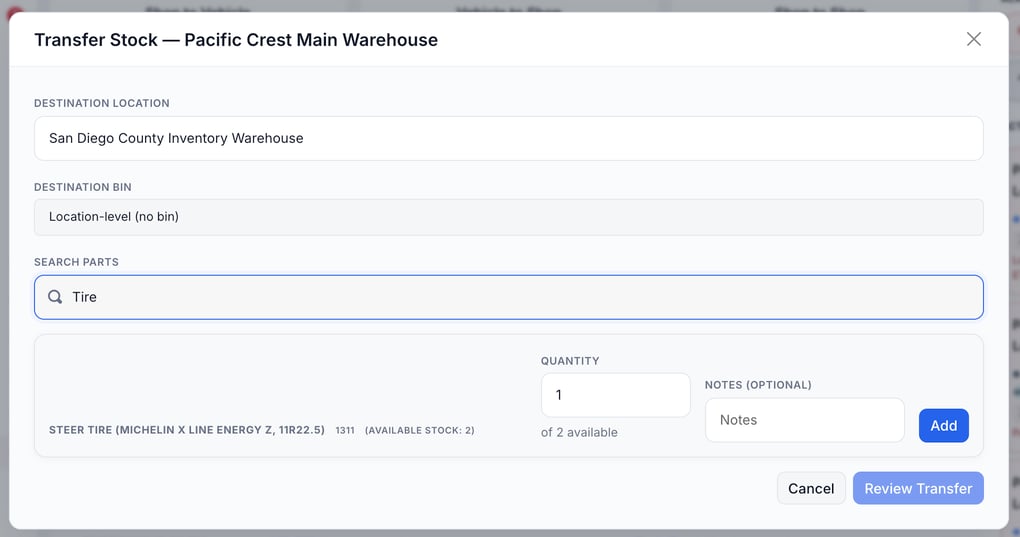
Select a part and the Quantity box shows how many are available at the source.
If you enter more than the available units, the box shows Only N are available at the source location, and you can't add the part.
A part with none available stays in the list, greyed, with the reason and no quantity box. If a part is kept in several bins, it is one row. The transfer takes from the bin with the most available first.
Review and confirm the transfer
Select Review Transfer. The review shows the From and To locations and, for each part, the Transfer Qty, the Source Remaining quantity, and the Dest New Qty. To change anything, select Back. To complete the move, select Confirm Transfer.
If a part comes from more than one bin, the review shows where it comes from, for example From B3: 10 · A1: 1.
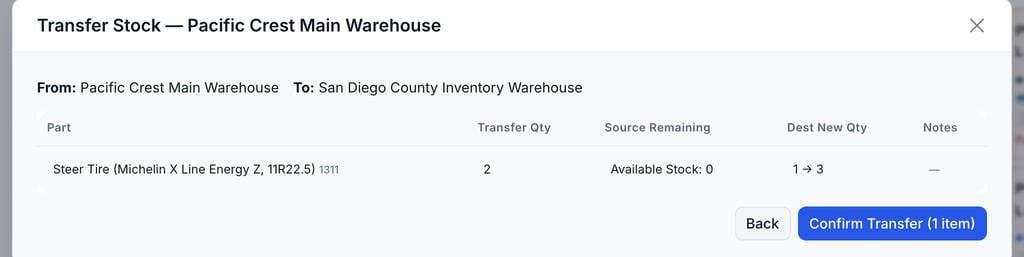
The review shows the quantity left at the source and the new quantity at the destination. Here 2 move, no units are left available at the source, and the destination goes from 1 to 3.
Completed moves appear under Recent Transfers on the Transfers page.
Read a location's History
Open Parts & Inventory › Inventory Locations and select a location. Then select its History tab. The tab lists every stock change for that location, including receives, issues, adjusts and counts. To change a count on purpose, see Receive, Issue & Adjust Stock.

Filter by type with the buttons above the list, or pick a date range with the From and To fields.
Each row shows the Date, Type, Part, Qty Change, the Value moved (shown only if you can view costs), the count before and after (Prev → New), the User, and the Notes.
A transfer writes a source row and a destination row. The source row shows the quantity out, with a note such as Transferred to the destination. The destination row shows the quantity in, with a note such as Transferred from the source. If a part came from more than one bin, you see one row per bin. The row in the picture is the source row of a 2-unit transfer out (3 → 1), with the note Transferred to Pacific Crest Main Warehouse.
Totals don't change. A transfer moves stock between two locations. The company-wide quantity stays the same.
Troubleshooting
| Symptom | Likely cause | Fix |
|---|---|---|
| "No transfers yet for this location" | No transfers have been made to or from this location yet | That's normal for a new location. Run a transfer and it appears under Recent Transfers. |
| A part doesn't show up in the transfer search | The source location has none of it in stock | Receive the part into the source first, then transfer. |
| A part is greyed out and has no quantity box | All of it is reserved for open service orders | The units free up when the open orders close or release the parts. Only available units can move. |
| A count changed and I don't know why | It came from a job, PO, or transfer | Open the location's History tab and read the Notes on that row. |
| "Only N are available at" a location | You asked for more than the available units (on hand minus reserved) | Enter N or less. |
FAQs
What's the difference between a transfer and an adjust?
A transfer moves stock from one location to another. The total stays the same. An adjust changes one location's count. See Receive, Issue & Adjust Stock.
Does a transfer show up in both locations' history?
Yes. It's logged as out of the source and into the destination.
Can I see who made a change?
Yes. The User column shows who made each change.