
For: Administrators and managers · Permission: Manage users · Time: ~5 minutes
Quick summary
- Go to Platform Settings › Users and click + New user.
- Enter the Name and Email, and pick a Role.
- Leave Email an invite now on and click Add and invite.
- Click the user's name in the list. Set the Primary Service Area, and for technicians the Services Provided.
- Add the user to Call Groups if they take phone calls.
Before you start
- You need the user's work email. Their invite goes there, and they sign in with it.
- Know the role, service area and, for technicians, the skills the user needs.
- Create the service areas first. See Create a Service Location.
- You can only give a role whose permissions you hold yourself. Other roles are locked and marked Above your access. Ask an administrator who holds the role to add this user.
Open the Users page
Click the gear icon in the top bar, then choose Users under Company in the Platform Settings menu. The page lists every user with their Name, Email, Role, Ext, Area and Status.

The tabs show a count. Not joined yet lists everyone who hasn't joined, and All users leaves out inactive users.
| Status | What it means |
|---|---|
| Active | The user has joined and can sign in. |
| Invited | The invite went out and the user hasn't joined yet. |
| Not invited yet | The user was added, but no invite went out. |
| Invite expired | The invite is more than 14 days old. Send it again. |
| Inactive | The user can't sign in. |
Add the user
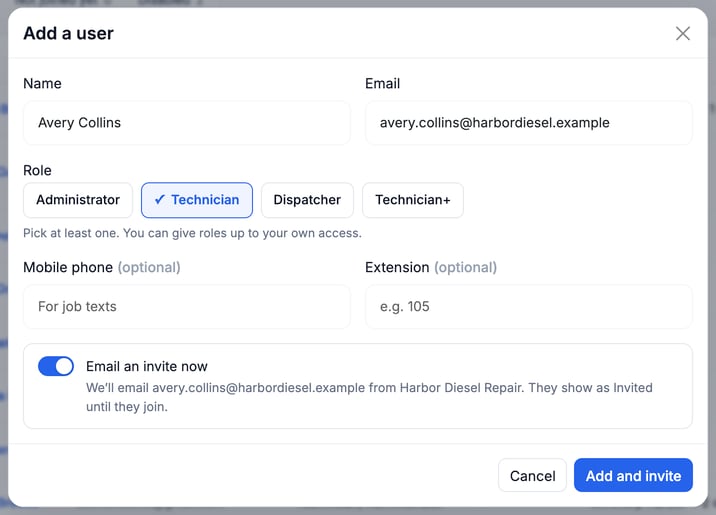
- Click + New user. The Add a user window opens.
- Enter the Name and Email. The email must not belong to another user at your company.
- Under Role, click at least one role. You can pick more than one.
- Optional: enter a Mobile phone for job texts and an Extension of 2 to 10 digits.
- Leave Email an invite now on to send the invite right away. The line under the switch shows the address it goes to.
- Click Add and invite.
Phone format. Type the phone number as
+1 6195550142: a plus sign, 1, a space, then 10 digits. Without the "+1 " the form shows "Phone number must be in the format: +1 ##########" and won't save.

You stay on the Users page. A green note confirms the invite went out, and the user shows as Invited until they join.
Add someone now and invite them later
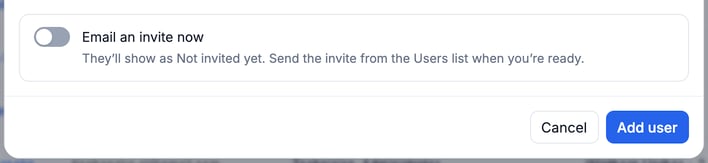
Switch Email an invite now off. The button changes to Add user, and the user shows as Not invited yet. No email goes out until you click Send invite on their row in the Users list.
Resend or cancel an invite
Find the user under Not joined yet and click ⋯ on their row.
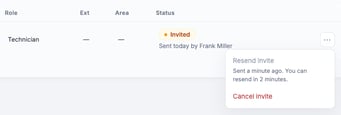
- Resend invite emails them again and restarts the 14 days. You can resend 2 minutes after the last send, up to 10 sends in all.
- Cancel invite asks you to confirm first. Click Cancel invite to remove the account and stop the link in their email, or Keep invite to leave it. You can add them again later.
For an active user, ⋯ shows Deactivate, or Reactivate on the Inactive tab. You need to manage users. See Deactivate or Remove a User.
Open the user's page
Click the user's name in the list. Click Edit on a section, make the change, then click Done (Stop Edit on Roles). You can do this before they join.
Change a role later
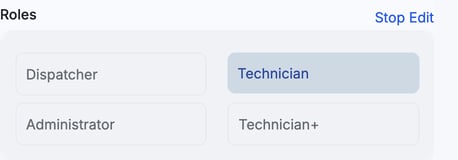
In Roles, click Edit, then click the role: Dispatcher, Technician, Administrator or Technician+. Click Stop Edit when you finish.
The active company owner shows Every permission in the Role column, and nobody in your shop can change the owner's roles.
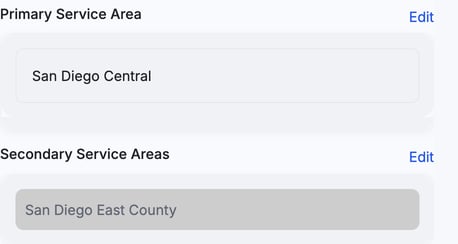
Set the service areas
- Primary Service Area: click Edit, then click the location where the user mainly works.
- Secondary Service Areas: click Edit and click each other location the user covers. Click Done.
Set the services and skills (technicians)
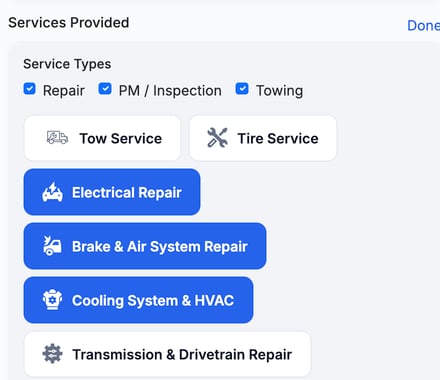
In Services Provided, click Edit. A new user starts with the service types Repair, PM / Inspection and Towing checked. Clear the ones the user doesn't do. Below them is a list of skill buttons, such as Electrical Repair. Click a button to turn that skill on. Click Done.
Keep at least one service type checked. With none checked the card shows "No service types selected" and the technician is never offered a job.
Service areas and services decide whether a technician shows up when a dispatcher assigns work. See Manually Assign a Technician and How Auto-Assignment Picks the Best Tech.
Add the user to call groups (optional)
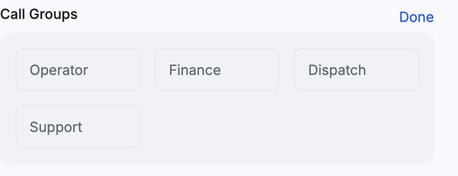
In Call Groups, click Edit and click each group: Operator, Finance, Dispatch or Support. Click Done. Call groups are used for phone routing.
How the new user joins
- The user opens the invite email and clicks Join with your company's name.
- On the join page they click Email me a code.
- They type the code from their email and click Join.
- They check their name and mobile phone. They can click Skip for now.
Their status changes to Active. The invite link lasts 14 days.
How the user signs in after that
There is no password. The user enters their work email on the MetaFleet sign-in page, and MetaFleet emails a one-time code. On the shared sign-in page they also enter your Company ID, so give it to them. If your company has its own sign-in address, there is no Company ID box: the address already tells MetaFleet which company.
Only the newest code works. After 5 wrong tries, that code stops working, even if the next try is right: ask for a new code and use that one. The account never locks.
Troubleshooting
| Symptom | Likely cause | Fix |
|---|---|---|
| The phone number won't save | The number is missing "+1 " | Enter it as +1 6195550142. |
| A technician doesn't appear when assigning a job | No service area, or the service types and skills don't fit the job | Set the Primary Service Area and check Services Provided on the user's page. |
| A role is locked and marked Above your access, or refused with "it grants permissions beyond your own" | Your own account doesn't hold that role's permissions | Ask an administrator who holds the role to set it. |
| The form says "Pick a role for" and the user's name | No role is picked | Click at least one role under Role. |
| The form says someone at your company already uses this email | That address already belongs to a user | Search the All users and Inactive tabs for it. |
| A red note says the user was added, but the invite email didn't go out | The email wasn't accepted. The account stays as Not invited yet | Check the address, then click Send invite on their row. |
| The user never got the invite | Email typed wrong, or it went to spam | Ask them to check spam. If the address is wrong, click ⋯, choose Cancel invite and add them again. |
| The join page says "This invite has expired" | The invite is more than 14 days old | Click ⋯ on their row and choose Resend invite. |
| The join page says "This invite isn't active" | The invite was cancelled, or the account is inactive | Add them again, or check the Inactive tab. |
| Resend invite is greyed out | It was sent in the last 2 minutes, or it has gone out 10 times | Wait 2 minutes. After 10 sends, check the address with them, cancel the invite and add them again. |
| A joined user doesn't get a sign-in code | Email typed wrong, or wrong Company ID | Open the user from Platform Settings › Users, click Edit under Personal Details, correct the email and confirm Change email. To change someone's email you must hold every permission that user holds. They sign in with the new email from then on. Also confirm the Company ID. |
| A user can't open certain pages | Their role doesn't include that access | Open the user and check the role under Roles. Add or change it. |
| The user isn't called by the phone system | Not in a call group | Add the user under Call Groups. |
FAQs
Do users need a password?
No. They join and sign in with a one-time code sent to their email.
Can I add someone without emailing them yet?
Yes. Switch Email an invite now off, then click Send invite on their row when you're ready.
How long does an invite last?
14 days. Each resend starts the 14 days again.
Can I change a user's role later?
Yes. Open the user from Platform Settings › Users, click Edit under Roles and choose another role.
Can a user have more than one role?
Yes. The Users list shows combinations such as Technician and Administrator.
Does every user need a service area?
Technicians and dispatchers who work a territory should have one. Administrators who don't work jobs can leave it empty.
Do all technicians need skills added?
Yes. Open Services Provided on the user's page and turn on each skill the technician has, and keep at least one service type checked.
Can I remove a user?
You can deactivate them. See Deactivate or Remove a User.
Where do I set shifts and time off?
Lower on the user's page, under Recurring schedule and Time off.