
Who this is for
Admins or office staff who manage customer companies and need to add contacts who can approve estimates, receive invoices, or access the Service Order Request Hub.
What you’ll learn
-
Where to add a contact inside a company record
-
What each role does (Authorizer, Accountant, Owner)
-
How to enable email updates and request SMS updates (with consent)
-
How to review and edit a contact after it’s created
Why it matters
The right contact setup prevents approval delays, ensures invoices go to the right person, and gives the customer the right level of access in the Service Order Request Hub.
Before you start
-
You have permission to edit companies and contacts
-
The customer company already exists in MetaFleet
-
You have the contact’s email (required) and phone number (only if SMS is enabled)
-
If you plan to enable text updates, your customer must have obtained consent from the end contact
Quick Summary (TL;DR)
-
Go to Company Details → Companies.
-
Open the company you want.
-
Click the Contacts tab.
-
Click the + button to add a new member.
-
Enter Name, Email, and select a Role.
-
Choose Email Updates and (optionally) Text Updates + Phone.
-
Click Create, then open the contact to review or edit details.
Step-by-Step
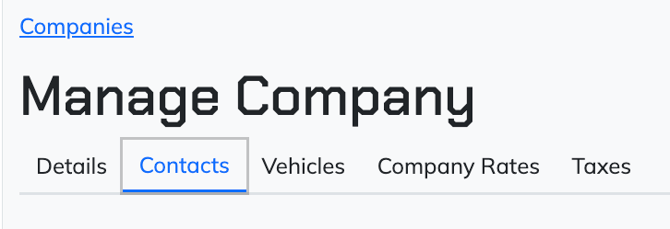
Step 1: Open the Companies list
From the homepage, go to the Company Details module and click Companies.
Step 2: Select the company
Click the company you want to add a contact to.
Step 3: Open the Contacts tab
Inside the company record, click Contacts (the second tab next to Details, before Vehicles).
Step 4: Add a new contact
Click the plus (+) button to add a new member.
Step 5: Enter contact info and choose a role
Fill in the required fields:
-
Email (required)
-
Name
-
Role (select one that matches what this person should be able to do)
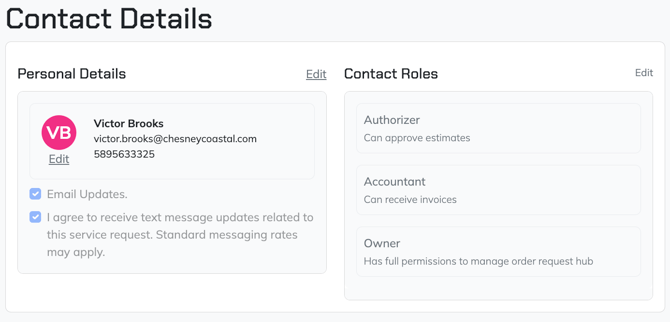
Role guidance:
-
Authorizer: can approve estimates
-
Accountant: can receive invoices
-
Owner: can manage access to the Service Order Request Hub (including inviting more users from their company if they have the rights)
Step 6: Choose notification preferences
-
Send Email Updates: enable if this contact should receive email notifications
-
Text Updates: enable only if the contact should receive SMS updates
-
If Text Updates is enabled, enter a phone number
-
Important: Your shop must obtain consent from the end contact before enabling SMS. MetaFleet may also send an opt-in confirmation as part of compliance.
-
Step 7: Create the contact
Click Create to save the new contact.
Step 8: Review and edit the contact
After creation, click the contact to open their details. You can update roles (Authorizer, Accountant, Owner) or other details as needed.
Troubleshooting
| Symptom | Likely Cause | Fix | Prevent |
|---|---|---|---|
| Can’t create the contact | Missing required fields | Add Email and Name, then retry | Collect contact info before setup |
| Contact isn’t receiving invoices | Wrong role or email updates disabled | Confirm Role = Accountant (if required) and Email Updates is enabled | Set roles based on what they need to receive/do |
| Customer can’t manage portal users | Owner role not assigned (or lacking rights) | Set Role = Owner and confirm they have access enabled for the Service Order Request Hub | Assign Owner only to trusted decision-makers |
| Text updates not working | No phone number, consent not obtained, or opt-in not completed | Verify phone number, confirm consent, and complete any opt-in flow | Always obtain consent and validate the number before enabling SMS |
FAQs
Can a contact approve estimates and receive invoices?
Yes, if your setup allows multiple permissions per contact. If roles are single-select in your version, create separate contacts or choose the role that matches the primary need. [VERIFY: role model]
Do contacts need an email address?
Yes. Email is required for contacts.
Who should be marked as Owner?
Someone at the customer who should manage Service Order Request Hub access and invite additional users, if enabled.
Can I change roles later?
Yes. Open the contact after creation and update their role(s) as needed.