
For: Dispatchers and technicians · Permission: Manage appointments (to book and to schedule follow-ups) · Time: depends on the form
Quick summary
- Book an Inspection visit and pick the inspection form for each vehicle.
- Click Begin Service, then start each vehicle with its odometer reading.
- Work the form: Pass, Defect or N/A on each item, with a note on every defect.
- Record anything else that needs fixing with Request a repair, then click Complete inspection.
- On the visit's Follow-ups tab, decide what each vehicle needs and book it: Schedule → for PM or inspection work, or a new repair appointment.
Before you start
- You'll need: a customer with at least one vehicle, and at least one inspection form set up under Settings › PM & Inspections.
- Who does what: technicians run the inspection and record what they find. Dispatchers decide what happens next. Scheduling follow-up work needs the Manage appointments permission.
- Technician steps are shown in the technician app on a phone. The dispatcher steps are on the web app.
Book the inspection visit
Go to Service › Appointment Requests and click + Create Appointment. Under What's included in this visit?, select Inspection. Select PM Service as well if the visit also includes a PM.
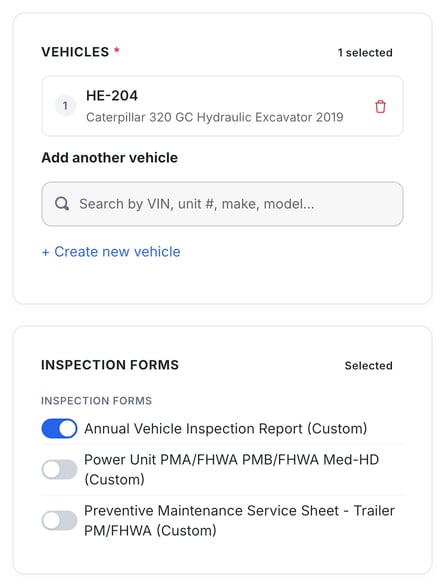
Add the customer, the on-site contact and the vehicles. Then, under Inspection forms, switch on the form each vehicle needs. Set the location, technician, date and time, and click Book Appointment. For every field on this page, see Book a PM, Inspection or Repair Appointment.
Begin service
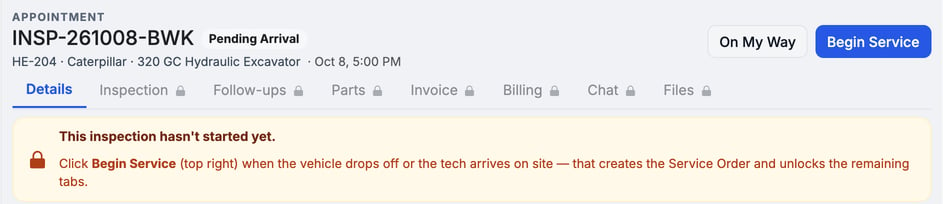
When the technician arrives or the vehicle drops off, open the visit and click Begin Service at the top right. This creates the Inspection Service Order and unlocks the Inspection, Follow-ups, Invoice and other tabs.
Begin Service doesn't ask for mileage and doesn't start any vehicle. Each vehicle is started on its own, in the next step. See Record Arrival & Start Service.
Start each vehicle (technician)
- Open the job: in the technician app, tap the inspection under My Jobs, then tap the vehicle.
- Start it: tap Start service, enter the Odometer reading on the keypad and tap Save & begin.
- Vehicle not there? Tap Vehicle not available instead, so the rest of the visit can still finish.
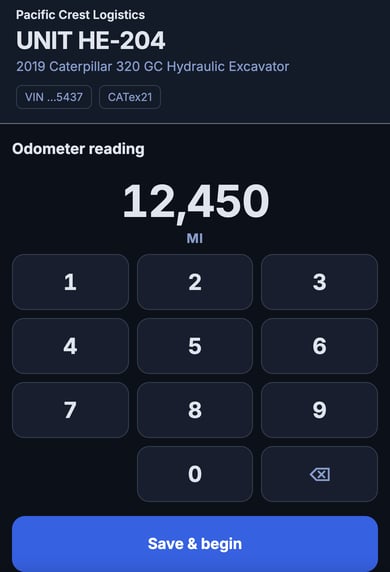
The form opens only after the vehicle is started. Until then the Inspection tab says "This service hasn't started yet." This way the form carries the reading taken at the vehicle. A dispatcher can also start a vehicle from the visit's Inspection tab with Start service or Not available.
Open the inspection form
The vehicle screen lists each inspection form on its own row, with a count such as 41 of 46 answered and a progress bar. A vehicle with two forms has two rows. Tap a row to open that form. Below the forms is Request a repair.
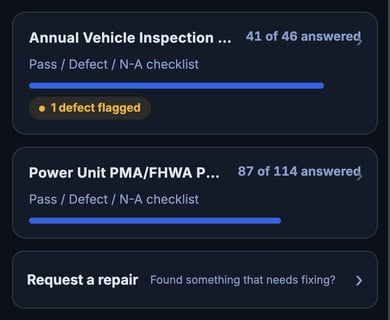
If the form has vehicle header fields, they're filled in for you in a Vehicle & visit card marked From the vehicle record, such as unit number, VIN, year, make, model, plate, date and customer. Only the arrival reading can be changed there. A value the vehicle record doesn't have shows as Not on file.
Work through the checklist and flag defects
Answer each item: Pass, Defect or N/A, or fill in the reading or text the item asks for. Answers save as you go.
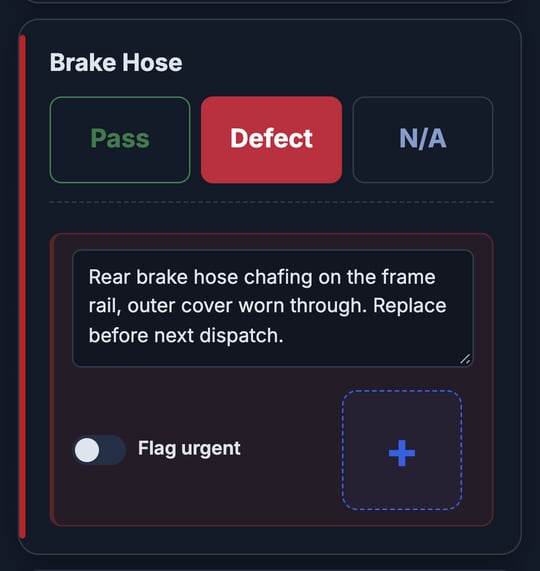
When you mark an item Defect, a box opens under it:
- Note (required): describe what you found. A defect can't be completed without one.
- Flag urgent: marks the defect as urgent on the record.
- +: add a photo or video of the defect.
If the form needs signatures, add them in the Signatures section at the bottom: enter the signer's name and role, sign, and tap Save signature.
Request a repair (technician)
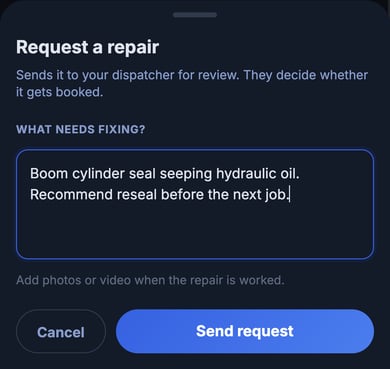
Found something that isn't on the form? On the vehicle screen, tap Request a repair. Describe it under What needs fixing? and tap Send request.
The request goes to the visit's Follow-ups tab. It doesn't book anything. Your dispatcher decides whether it gets booked.
Complete the inspection
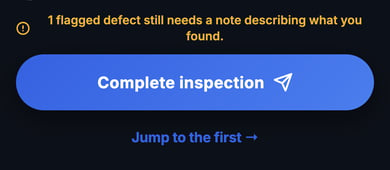
Tap Complete inspection. If something is missing, the line above the button says what, and Jump to the first → scrolls to the first item to fix:
- Required items are marked with *. Any left unanswered turn red with "Required — answer this item to complete the inspection." The highlight clears as you answer.
- Defects without a note are counted, for example "1 flagged defect still needs a note describing what you found."
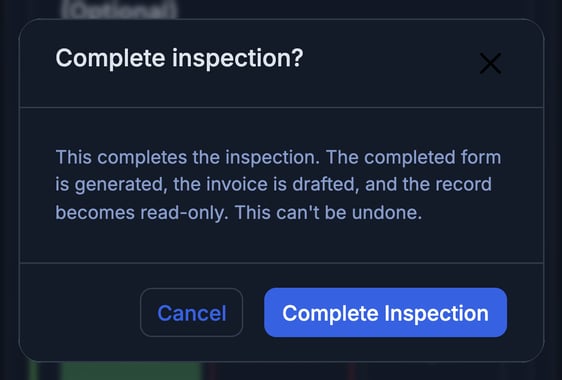
When everything is answered, confirm with Complete Inspection. The completed form is generated, the invoice is drafted and the inspection becomes read-only. This can't be undone. On an inspection-only visit, the vehicle then shows Vehicle complete. If this finishes the visit, your job clock on the order stops too.
Review findings on the Follow-ups tab (dispatcher)
Open the visit and click the Follow-ups tab. The tab shows a count while vehicles still need a decision, for example Follow-ups (1).
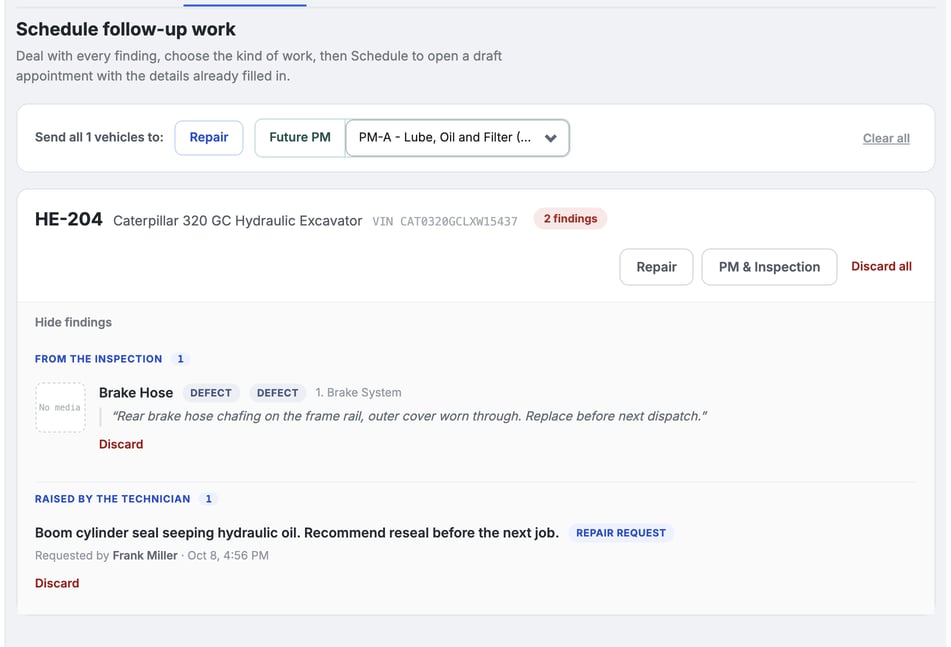
Each vehicle has its own card. Click Show findings to see them, grouped as From the inspection (defects, with the technician's note and any photos) and Raised by the technician (repair requests, with who sent them and when).
- Discard: a finding that needs no work. Discard all does this for the whole vehicle.
- Several vehicles? The Send all row at the top gives every vehicle the same choice at once. Clear all undoes it.
Schedule the follow-up work
PM or inspection follow-ups are booked straight from the card:
- Choose the work: on the vehicle card, click PM & Inspection and pick the service program.
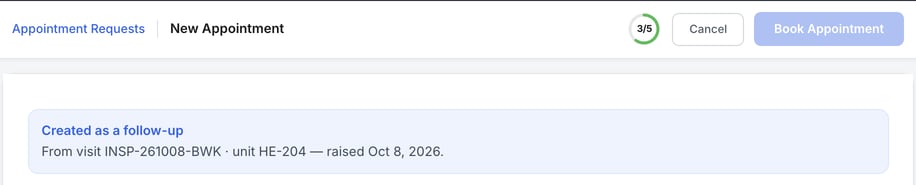
- Click Schedule →. A New Appointment draft opens with a Created as a follow-up note naming the visit and unit. The customer, vehicle, service location and payment are already filled in.
- Finish the booking: add the on-site contact, the date and time, and a technician. The date and the PO number aren't copied from the original visit, because the new job needs its own. Click Book Appointment.
Repair follow-ups are booked as a repair. Schedule → opens the PM and inspection booking page, so book the repair from Service › Appointment Requests instead: click the arrow next to + Create Appointment and choose Repair, or click an empty slot on the calendar. Copy the defect notes into the repair's description so the technician knows what to fix.
One booking per vehicle. Schedule → covers all of a vehicle's findings, so five defects on one truck become one appointment. Nothing is booked until you click Book Appointment on the draft.
Send the inspection forms with the invoice
On the visit's Invoice tab, switch on Email the completed inspection forms before you click Send Invoice. The line under it says how many forms will go with the invoice email. With the switch off, the customer gets the invoice only. You choose this each time you send. It isn't saved for the customer.

The completed forms are also kept on the visit's Files tab under Completed inspection forms. Click Download completed form to get the PDF.
Troubleshooting
| Symptom | Likely cause | Fix |
|---|---|---|
| The form says "This service hasn't started yet." | The vehicle hasn't been started | Tap Start service and enter the odometer reading, or mark it Not available. |
| Complete inspection says a required item still needs an answer | An item marked * is unanswered | Tap Jump to the first → and answer each red item. |
| Complete inspection says a flagged defect still needs a note | An item is marked Defect with no note | Tap Jump to the first → and describe the defect. |
| "No inspection form is assigned to this vehicle on this visit." | No form was chosen for the vehicle | On the visit's Details tab, click Edit on Service work, add the form and click Save. |
| "You do not have permission to schedule follow-up work." | Your role doesn't have Manage appointments | Ask a dispatcher or an admin to schedule it. |
| A banner says "You're working on a different job." | The technician's clock is still running on another job | Tap Go to that job to finish it, or Clock out of that job. |
| Findings are still listed after you book the follow-up | The new booking isn't linked back to the findings | The booked appointment is your record of the work. Leave the findings, or click Discard on them once the follow-up is booked. |
| The Follow-ups tab says "Nothing outstanding on this visit" | No defects were flagged and no repairs were requested | Nothing to do. Anything a technician raises later appears here. |
FAQs
Can a technician book the repair from the phone?
No. Technicians record defects and repair requests. A dispatcher with Manage appointments decides on the Follow-ups tab and books the work.
Does each defect become its own appointment?
No. You decide per vehicle. One booking covers every finding on that vehicle.
What if a defect doesn't need any work?
Click Discard on that finding, or Discard all for the vehicle. Only users with Manage appointments can discard findings.
Can one vehicle have more than one inspection form?
Yes. Each form has its own row on the vehicle screen, with its own count of answered items.
Can a visit include a PM and an inspection?
Yes. Select both PM Service and Inspection when you book. See Book a PM, Inspection or Repair Appointment.
Where do I find the completed form later?
On the visit's Files tab, under Completed inspection forms.