
Admins and service managers who manage purchasing and parts sourcing. You'll need the Manage Parts permission.
What you'll learnHow to add a vendor, record their contact, lead time, order method, payment terms, and pricing rule — and how vendors connect to the parts you buy from them.
Before you start- You'll need: The Manage Parts permission. Vendors live under Parts & Inventory → Vendors — a separate list from Parts and Manufacturers.
- Manufacturer vs vendor: A manufacturer makes the part; a vendor sells it to you. A part has one manufacturer and an optional preferred vendor.
Quick summary
- Go to Parts & Inventory → Vendors.
- Click + New vendor.
- Enter the name, contact, average lead time, order method, and payment terms.
- (Optional) add a pricing rule (markup or discount).
- Click Create vendor.
Open Vendors.
Go to Parts & Inventory → Vendors. Each row shows the contact, lead time, how you order, payment terms, parts sourced, pricing rule, and status — at a glance.
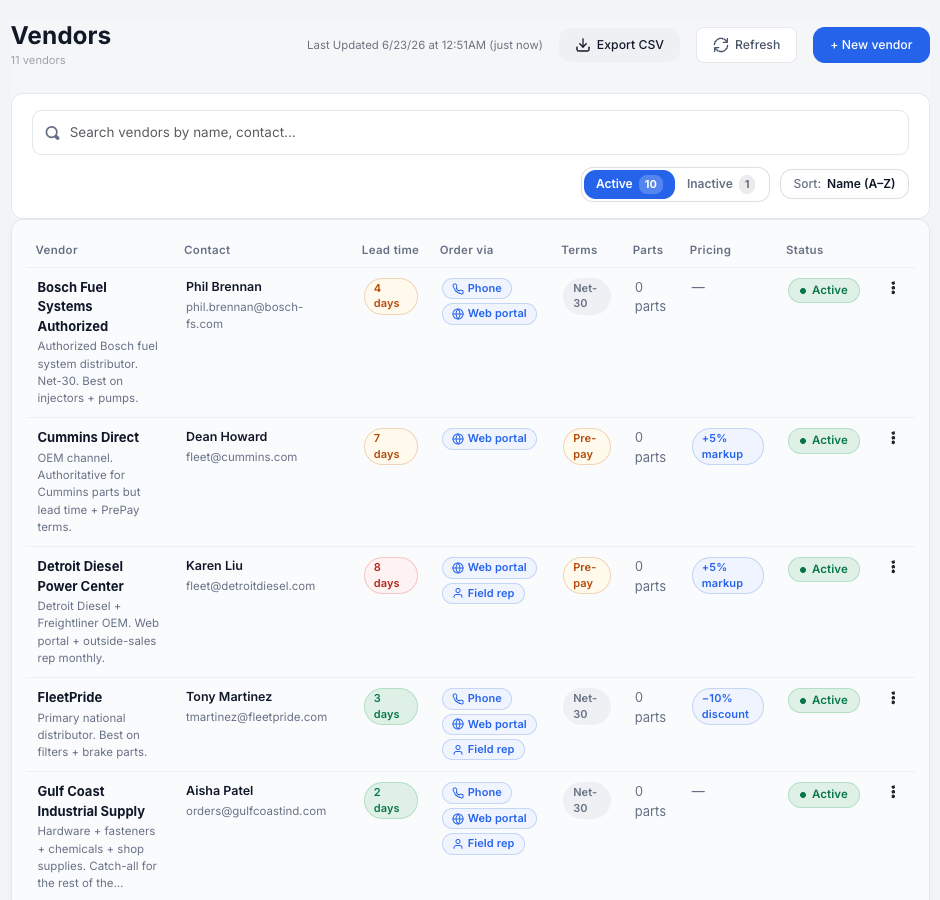
The Vendors list — everything you need to compare suppliers in one view.
Click + New vendor.
The Add Vendor window opens.
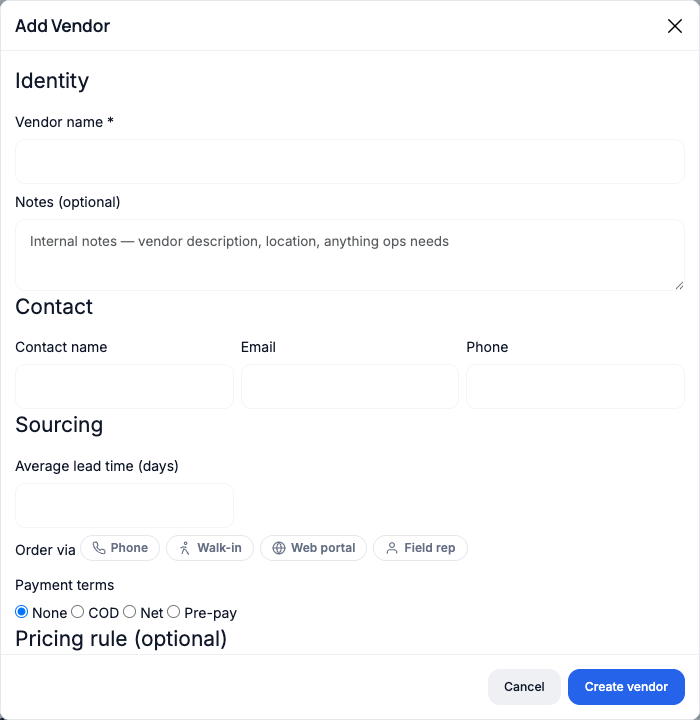
The Add Vendor window, grouped into Identity, Contact, and Sourcing.
Fill in the details.
Vendor name is required. Add optional Notes (description, location, anything ops needs) and a Contact (name, email, phone). Under Sourcing, set the Average lead time in days, pick how you order (Phone, Walk-in, Web portal, or Field rep), and choose Payment terms (None, COD, Net, or Pre-pay).
Add a pricing rule (optional)
Record a standing markup or discount you get from this vendor so cost comparisons stay accurate.
Click Create vendor.
The vendor is added and ready to attach to parts as a preferred supplier.
Connecting a vendor to a part. Open any part and set its Preferred vendor in the Vendor & Sourcing section (see Add New Parts / Editing Existing Parts). The vendor's average lead time then drives the colored sourcing chips on the Parts list — unless you set a per-part lead-time override.Managing existing vendors
Use the search and the Active / Inactive tabs to find a vendor. Click a vendor's status pill to deactivate it (it stops appearing in the preferred-vendor picker but stays on parts already sourced from it). Use the row's ⋯ menu to edit details.
Troubleshooting| Symptom | Likely cause | Fix |
|---|---|---|
| A vendor isn't in the part's preferred-vendor picker | It's set to Inactive | Reactivate it from the Vendors list (click its status pill). |
| Lead-time chip on a part looks wrong | The part has a per-part lead-time override | Clear the override on the part to fall back to the vendor's average. |
| Create vendor is blocked | Missing the required vendor name | Enter a name — it's the only required field. |
Can a part have more than one vendor?
Each part has one preferred vendor for sourcing. You can change it any time from the part's Vendor & Sourcing section.
What does the pricing rule do?
It records the standing markup or discount you get from that vendor, so your cost comparisons reflect reality.
Do I have to fill in everything?
No — only the vendor name is required. Add contact, lead time, and terms as you have them.